After the performance you put in front of the microphone, the most important consideration in a recording is the space you record in. It's also the one that is given least consideration. We tend to think that we can ‘fix it in the mix’, but the truth is that a poorly captured sound will always sound like a poorly captured sound.
I was fortunate to do my ITT (initial teacher training) in a Sixth Form College with not only dedicated recording facilities, but a whole recording setup designed specifically around the students' needs. I have subsequently taught in institutions with facilities ranging from professional-level spaces to the non-existent. The impact that these spaces have on learners goes far beyond just the quality of their recordings; establishing a workflow, understanding the impact of acoustics first-hand, and managing a recording space creates a sense of value in the learners' work, and is ultimately reflected in the music they make. Building a studio space may seem like a daunting task, but it does not have to be prohibitive either technically or financially, and the benefits of setting up a studio far outweigh the efforts.
Choosing a studio room
Before embarking on any studio project, take stock of existing facilities. It's easy to presume that we have to turn an existing space into a recording facility, when a different space may convert far more easily. A bit of negotiation (I find baking a few cakes works well!) may proffer a room-swap to something much more suitable and easily converted into a dedicated studio space. The main considerations when deciding on a space are:
- Ambient noise – Is my recording space in a high traffic area? Will I have to compete with the noise of changing classes, traffic, building work, or – in one particularly memorable job – the quacking of ducks from the duck pond?
- Space – Ideally, we want a room with minimal reverberations. In practice, the smaller the space, the easier that is to achieve. Especially in environments where space is at a premium, finding a room which is big enough to accommodate your largest recording ensemble but small enough to control reflections will save a lot of unnecessary expenditure.
- Practicality – The final, and easy to overlook, issue is that the space has to be workable. If it's located on the fourth floor, but the drum kit lives on the ground floor, not only are you creating unnecessary work, but you're potentially risking damage to equipment or injury to anyone doing the carrying.


Acoustic panelling at Reigate College
Planning your studio build
There are two jobs required in a studio: tracking and monitoring – the process of capturing sound, and the process of listening to that sound. Ideally, your studio design should allow for confidence monitoring, i.e. can I hear the sound as it's being captured in real time? The best solution is to have a separate ‘live’ room and ‘control’ room. This can be easily achieved in any space with a temporary partition.
For my home studio, I have a sliding partition to create a live room. The solution isn't ideal; the glass still allows a certain amount of the ‘live’ sound into the control space, and I appreciate that glass walls and schools may not be the best combination, but it works for the type of recording I do most frequently.
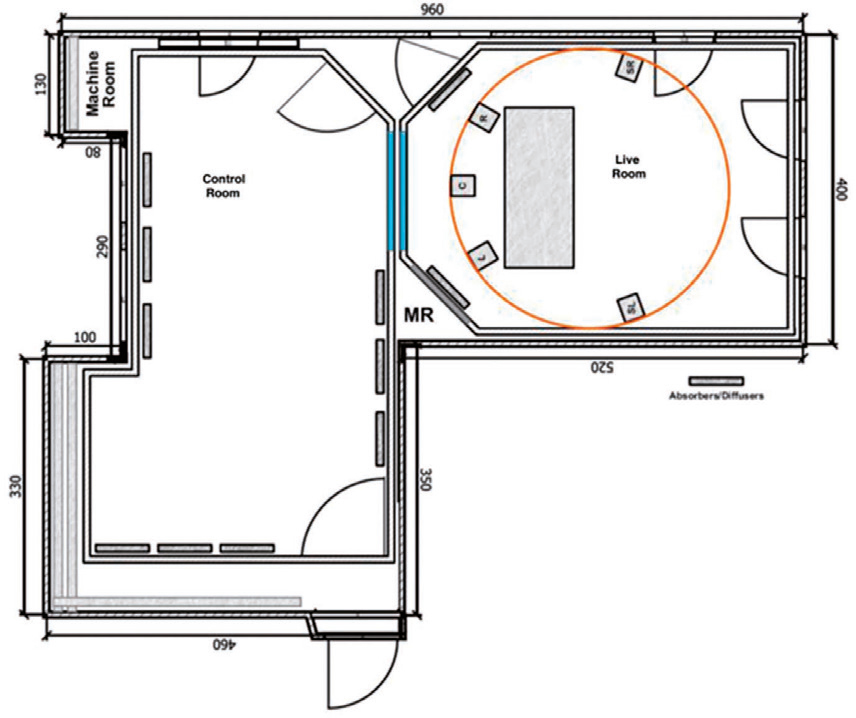
For the studio design I proposed for my last school (see below), my solution for the space was to build two spaces, which could either be patched together as a control room/live room pair, or used independently as two fully functioning spaces. This allowed for maximum benefit for my students, without increasing the footfall allotted to Music Technology, while still giving me a teaching space.

Dale Wills' proposed school studio floorplan
Consider the needs of your students: is your centre more heavily focused on beat-makers and singers, in which case a vocal booth may be the best solution? Or, bands and ensembles, in which case a larger live space might be needed? In both of my solutions, I was careful to ensure that visual contact could be maintained between the artist and producer while recording. Having worked in studios where this is not the case, not having a sightline can take some getting used to.
Designing your studio space
Of the two jobs your studio will do, listening is the first to consider when putting a design together. Start with where your listening position will be and work backwards. In an ideal world, I want to hear the sound I have recorded: in practice, that sound will be coloured by the space I listen in. Before we even delve into the realm of acoustic treatment, there are a few simple steps to take in order to minimise the sound in the room:
- Listening position
Place the monitors on the shortest wall in the room. This isn't best practice, this is a must. Unless your room is a perfect square, the reflections will have the longest possible distance to travel. As the sound travels, its intensity decreases in inverse proportion to the distance from the monitors. The difference in the quality of sound when it travels a longer distance and when it hits a nearer wall is really significant, and this costs nothing to set up.
Position the monitors so that they form an equilateral triangle with the listening position. This might be different from the engineering position in a school studio. Do I want the optimal listening position to be for the person running the DAW (digital audio workstation), or for the class positioned behind them? In either event, position the monitors so that the main drive (the cone) is as close to ear height as possible.
Finally, position the monitors ideally 30–40cm from the wall, and not in the corner of the room, if possible. For this job, you may well want to invest in some speaker stands. These are inexpensive, should have adjustable height, and also serve to isolate the monitors from the walls and floor, for which your neighbours will thank you!
Acoustic treatment
Acoustic treatment is a bit like jam – once you've taken the plunge into making your own, you will never go back! And it's easier than you think, even for someone like me with limited DIY skills! The only thing to know is that treatment comes in two types; absorbers and diffusers, which perform different functions.
- Absorbers
Any sufficiently high-density material will absorb sound. The first, and most often overlooked, absorber is a floor rug. Sound propagates in all directions and will easily reflect off concrete or wooden floors, and those worn-out institutional carpet tiles are not going to do much to stop it! Studio rugs serve two purposes; to absorb sound, and to double as handy cable management tools when you're running a multitrack setup.
The added and unintended benefit is that they create what my students describe as ‘a vibe’. Part of this process is creating a space where students want to spend time and get used to the mechanics of recording and making music. Charity shops can frequently provide an ethical source of cheap, thick rugs. A word of warning: leave your vanity at the door. That pristine rug is not going to stay clean for long (I'm always a little suspicious of clean studio rugs!). For more problematic floors, rubber matting is available from a range of sources at surprisingly low cost.


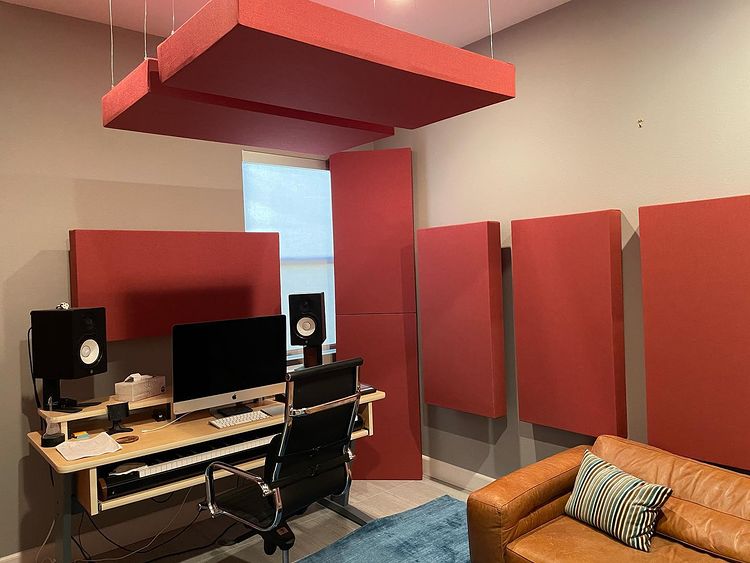
Dale Wills' home studio
Depending on your space, you may want to opt for wall-mounted or movable absorption panels. The effort of building a panel far outweighs most of the pre-made sponge alternatives on the market. These should be positioned at the main reflection points in the room – the points where your monitors first interact with walls, the reflection points from any recording sources.
Panels can be constructed easily from a frame, some absorbent foam, and a covering of your choice. This can be a great way of getting students involved in the project and using up those insulation panels left over the loft (NB: if using Rock Wool or similar, ensure gloves and respirators are used at all times). For a faster solution, prebuilt panels are available – shop around; anything with the word ‘acoustic’ in the product title tends to attract a premium. Studiospares is frequently a useful starting point.
- Diffusers
For bass frequencies, the amount of material required to absorb the wavelength would take up an impractical amount of space. Rather than absorb the energy, an alternative solution is to diffuse the wave into less problematic aberrations. Diffusers come in two types: Skyline or quadratic. Quadratic diffusers can be built to take up the corners of the room, functioning as ‘bass’ traps. Skyline diffusers take more prominent positions and can make attractive additions to a space. The maths behind both is fairly straight forward, but for the less carpentry-inclined, pre-designed kits are available from Gear4Music, which require no more skill than putting a wardrobe together.
- Modular pods
For centres requiring a more bespoke solution, modular pods are an excellent option. These prefabricated units can be made in a variety of sizes and designs, and for a variety of budgets. These range from the telephone-box-sized vocal booth like the Studiobricks range from Black Cat Acoustics to spaces big enough to fit a whole class in, for example the modular solutions from Kube. The Vicoustic VicBooth range from Thomann provides an easy self-build option which can be customised to most spaces. All of these models can be supplemented with patch bays and routing for cables as required.
Equipment in your studio space
Once the space has been set up, the next consideration is the equipment in the studio. I would suggest that the biggest part of an available budget should go to near-field monitors. A range of options are available for any budget, ranging from the classic KRK RP5 to bespoke solutions from Adam and Genelec. I am personally still in love with my PMC Result 6 monitors, which offer an amazingly even and clear sound across the spectrum. Whatever your solution or budget, I would recommend testing the speakers in your space before committing to a purchase.
The next decision will be how to get sound into your DAW. Whether your choice is for an audio interface, controller, or dedicated sound desk will depend on a number of factors: budget, space, and primarily the type of recording you will be doing.
In my last centre, I built the studio around a Behringer X32, which, although primarily a live sound desk, does come with some particularly smooth preamps. The desk supports recording at up to 48kHz, which is sufficient for most Level 3 projects. While there were occasions when having 32 potential inputs was useful, the majority of its lifespan was spent tracking single line vocals. The advantage was that my learners quickly acclimatised to routing digital desks and, in particular, producing individual headphone mixes.


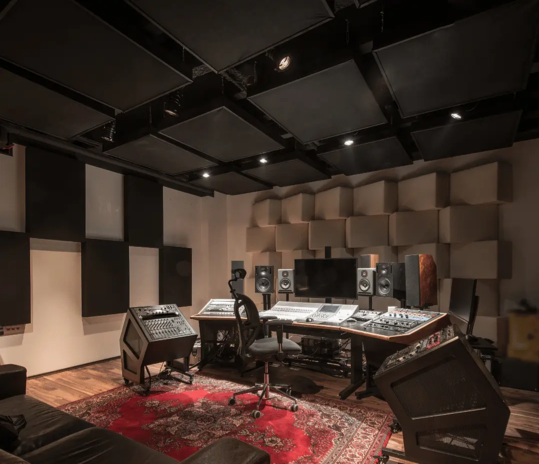
Acoustic panelling at a studio in Brighton
For a more streamlined approach, a Focusrite Scarlett 18i20 or MOTU 8 Pre-es provide rackmount solutions, which support recording at much higher sample rates and take up considerably less space. For a hybrid solution, a range of DAW controllers are available which give the experience of a large console setup, without the space constraints. At the entry point, Behringer X Touch USB – DAW Controller provides a useful centre point for a studio setup. For more functionality, the Icon QCon Pro can train students in the workflow of a studio console without breaking the bank.
The list of must-have studio microphones is a well-trodden path, and a separate discussion. Suffice to say that I would be reluctant to trust any professional studio without at least three SM57s. In addition, microphone stands are something of a pandora's box of options. I would recommend at least a pair of heavyweight weighted stands. Budget microphone stands have limited shelf lives, especially in educational environments, and the novelty of balancing drum overheads with bags and coats wears out surprisingly quickly.
My final recommendation for the build-plan would be to factor in a dedicated recording drum kit. Practice kits are herculean in the amount of abuse they take over the years, but this rarely translates into first-rate recordings. Also, the instrument that sounds good in a live environment is rarely the same instrument which translates well to a recording. With a bit of patience, and shopping, this does not have to be a prohibitive expense.
With the sort of imagination, patience and ingenuity that have become the benchmarks of our teaching practice over the last few years, a studio space is not only possible, but easily achievable. The benefits of setting up a designated space will more than repay the efforts that go into it. It's worth remembering when you start out that a studio is never finished. Your space will grow and evolve with you, your students, and the music you make.


